New Widgets, Part 2
Now that we have created our simple widget, and have tested to make sure it works, we can move on to adding some functionality to it. Our simple widget will serve as a single-track step sequencer. Users should be able to specify the number of steps in the sequence, as well as speed of 'playback'.
Adding new custom identifiers
As there are currently no pre-existing identifiers that can be used for the aforementioned two properties, we will need to create them ourselves by adding them to the IdentArray class in CabbageGUIClass.h.
// this array holds the name of identifiers used in Cabbage syntx
class IdentArray : public StringArray
{
public:
    IdentArray()
    {
        add("numberOfSteps")
        add("stepbpm")
(...)
We then need to add some code to the CabbageGUIType::parse(...) method. You'll see that this method contains a number of conditional statements relating to numeric, or string parameters. In the if-else's for numeric parameters we add the following code:
else if(identArray[indx].equalsIgnoreCase("numberOfSteps"))
{
    cabbageIdentifiers.set("numberOfSteps", strTokens[0].trim().getIntValue());
}

else if(identArray[indx].equalsIgnoreCase("stepbpm"))
{
    cabbageIdentifiers.set("stepbpm", strTokens[0].trim().getIntValue());
}
The CabbageGUIType::parse(...) method is passed a line of Cabbage code, and from that code it sets each of the widget's identifiers. The above code checks if the line contains a numberOfSteps, or stepbpm identifier. If it does, Cabbage will set the value of the identifier with the number passed to it in the user's Cabbage code.
It's worth checking the list of existing Cabbage identifiers before creating new ones. In many cases, pre-existing identifiers can be used. For example, we don't need to create a special
steppercolour()identifier for our new widget. We can just use the pre-existing colour() identifier instead.
Now that we have added two unique stepper identifiers, we might as well go ahead and add default values for them in the CabageGUIType class constructor.
    (...)
    //===============stepper==================//
    else if(strTokens[0].trim() == "stepper")
    {
        cabbageIdentifiers.set("basetype", "layout");
        cabbageIdentifiers.set(CabbageIDs::top, 10);
        cabbageIdentifiers.set(CabbageIDs::left, 10);
        cabbageIdentifiers.set(CabbageIDs::width, 160);
        cabbageIdentifiers.set(CabbageIDs::height, 2);
        cabbageIdentifiers.set(CabbageIDs::colour, Colours::white.toString());
        cabbageIdentifiers.set(CabbageIDs::type, "stepper");
        cabbageIdentifiers.set(CabbageIDs::name, "stepper");
        cabbageIdentifiers.set(CabbageIDs::name, cabbageIdentifiers.getWithDefault("name", "").toString()+String(ID));
        cabbageIdentifiers.set(CabbageIDs::identChannel, "");
        cabbageIdentifiers.set(CabbageIDs::visible, 1);
        //new identifiers
        cabbageIdentifiers.set("stepsbpm", 60);
        cabbageIdentifiers.set("numberOfSteps", 12);
    }
    (...)
Developing our CabbageStepper class.
Now that we have taken care of the two new identifiers, we can get cracking on our stepper widgets. The first thing will need to do is paint a number of 'steps'. The number of steps is dynamic and it set by the user. All
painting/drawing is done in the widget's paint(...) method which is passed a Graphics context. To paint something on our widget we can call any number of special painting routines defined in JUCE's Graphics class. Our
simple widget will need to paint some rectangles. To do this will will make some calls to JUCE::Graphics::fillRoundedRectangle(...). Note that we also create a simple integer array that will hold the current state
of each steps. All steps are off by default.
class CabbageStepper    :   public Component
{
    String name;
    float numberOfSteps;
    int stepBPM;
    Colour colour;
    Array<int> stepStates;

    public:

    CabbageStepper (CabbageGUIType &cAttr, CabbagePluginAudioProcessorEditor* _owner)
        : Component(),
        owner(_owner),
        name(cAttr.getStringProp(CabbageIDs::name)),
        colour(Colour::fromString(cAttr.getStringProp(CabbageIDs::colour))),
        stepBPM(cAttr.getNumProp("stepbpm")),
        numberOfSteps(cAttr.getNumProp("numberOfSteps"))
    {
        for(int i=0;i<numberOfSteps;i++)
            stepStates.add(0);
    }

    void paint(Graphics& g)
    {
        g.fillAll(Colours::transparentBlack);
        float stepWidth = getWidth()/numberOfSteps;
        for(int i=0;i<numberOfSteps;i++)
        {
            g.setColour(stepStates[i]==1 ? Colours::lime : colour);
            g.fillRoundedRectangle(stepWidth*i, getHeight()*.05, stepWidth*.9, getHeight()*.9, 5.f);
        }
    }
(...)
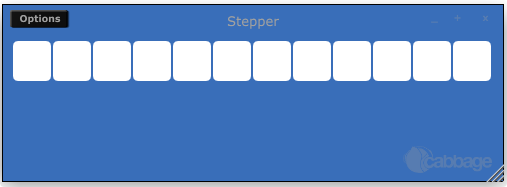
With the above paint() method, our widget now renders like this.
The next thing to add is the ability to select a step within the sequence. To do this will need to add a mouseDown() method. As the name suggests, a mouseDown() method will check for mouse down events. Users should be able to enable a step in the sequence by clicking on it with the mouse. In order to test for mouse clicks we must override the JUCE::Component::mouseDown(...) method. Each of JUCE's mouse event methods gets passed a special MouseEvent object that contains information about the mouse event. One can access the current position of the mouse, the number of clicks, the mouse button that was pressed, and lots more besides.
In our mouseDown(...) method, we need to check the position of the mouse click. If the user has clicked on a step that is currently disabled, we need to enabled it, otherwise we should disable the step. We also need to call the JUCE::Component::repaint() method once we have dealt with the mouse click. This will cause our widget's paint method to be caled, so that it can refresh itself.
    void mouseDown(const MouseEvent& event)
    {
        int x = event.getMouseDownX();
        float stepWidth = getWidth()/numberOfSteps;
        for(int i=0;i<numberOfSteps;i++)
        {
            if(x>i*stepWidth && x<i*stepWidth+stepWidth)
                stepStates.getReference(i) = stepStates.getReference(i)==1 ? 0 : 1;

            repaint();
        }
    }
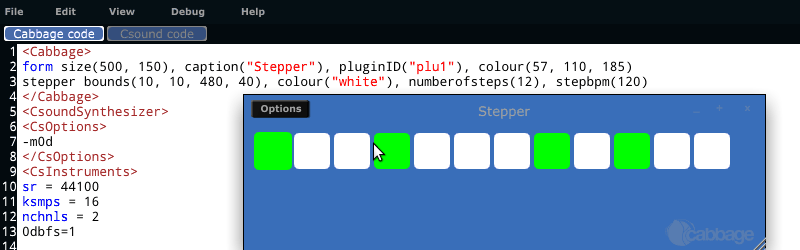
Users can now enable/disable steps by clicking on them.
Right now our stepper widget doesn't actual 'step', so to speak. In order to step through each, er, step, we need to add some kind of timer. JUCE comes with a very simple Timer class that we can use. We can simple inherit
it. The JUCE::Timer class has a pure virtual method that has be overridden. That method is called timerCallback(). This method will be called periodically at a user defined rate. We will set it up
to fire at whatever the user has passed to the stepbpm() identifier by passing a timer interval to the startTimer(...) method.
class CabbageStepper    :   public Component, public Timer
{
    String name;
    float numberOfSteps;
    int stepBPM;
    Colour colour;
    Array<int> stepStates;

    public:

    CabbageStepper (CabbageGUIType &cAttr, CabbagePluginAudioProcessorEditor* _owner)
        : Component(),
        owner(_owner),
        name(cAttr.getStringProp(CabbageIDs::name)),
        colour(Colour::fromString(cAttr.getStringProp(CabbageIDs::colour))),
        stepBPM(cAttr.getNumProp("stepbpm")),
        numberOfSteps(cAttr.getNumProp("numberOfSteps"))
    {
        for(int i=0;i<numberOfSteps;i++)
            stepStates.add(0);

        startTimer((60/stepBPM)*1000);
    }

    void timerCallback()
    {
        cUtils::debug("I'm stepping!!");
    }
Now that we have a timer going, we need to provide the user with some kind of visual indicator as to the current step. There are several ways to do this. We could for example colour the current step so that it is different from the others. But this might lead to some confusion when the current step matches one of the selected steps. In this case it may be best to dynamically resize the current step so that it is slightly larger than the others. This is quite simple to do. We simply create a currentStep variable that will hold the currentStep index, and modify our paint routine so that it paints the current step larger than the others.
class CabbageStepper    :   public Component, public Timer
{
    String name;
    float numberOfSteps;
    int stepBPM, currentStep;
    Colour colour;
    Array<int> stepStates;

    public:

    CabbageStepper (CabbageGUIType &cAttr, CabbagePluginAudioProcessorEditor* _owner)
        : Component(),
        owner(_owner),
        name(cAttr.getStringProp(CabbageIDs::name)),
        colour(Colour::fromString(cAttr.getStringProp(CabbageIDs::colour))),
        stepBPM(cAttr.getNumProp("stepbpm")),
        numberOfSteps(cAttr.getNumProp("numberOfSteps")),
        currentStep(0)
    {
        for(int i=0;i<numberOfSteps;i++)
            stepStates.add(0);

        startTimer((60/stepBPM)*1000);
    }

    void timerCallback()
    {
        currentStep = currentStep<11 ? currentStep+1 : 0;
        repaint();
    }

    void paint(Graphics& g)
    {
        g.fillAll(Colours::transparentBlack);
        float scaleSize, scaleTop;
        float stepWidth = getWidth()/numberOfSteps;
        for(int i=0;i<numberOfSteps;i++)
        {
            g.setColour(stepStates[i]==1 ? Colours::lime : colour);
            scaleSize = currentStep==i ? .95 : .9;
            scaleTop = currentStep==i ? .025 : .05;

            g.fillRoundedRectangle(stepWidth*i, getHeight()*scaleTop, stepWidth*scaleSize, getHeight()*scaleSize, 5.f);
        }
    }
   (...)
Now the user can clearly see which is the current step in the sequence.