Using Cabbage
Instrument development and prototyping is carried out with the main Cabbage IDE. Users write and compile their Csound code in a code editor. Each Csound file opened with have a corresponding editor. If one wishes one can also create a graphical frontend, although this is no longer a requirement for Cabbage. Any Csound file can be run with Cabbage, regardless of whether or not it has a graphical interface. Each Csound files that is compiled by Cabbage will be added to an underlying digital audio graph. Through this graph users can manage and configure instrument to create patches of complex processing chains.
Building/exporting instruments
Creating GUI interfaces for instruments
Opening files
User can open any .csd files by clicking on the Open File menu command, or toolbar button. Users can also browse the Examples menu from the main File menu. Cabbage ships with over 100 high-end instruments that can be modified, hacked, and adapted in any way you wish. Note that if you wish to modify the examples, use the Save-as option first. Although this is only required on Windows, it's a good habit to form. You don't want to constantly overwrite the examples with your own code.
Cabbage can load and perform non-Cabbage score-driven .csd files. However, it also uses its own audio IO, so it will overwrite any -odac options set in the CsOptions section of a .csd file.
Creating a new file
News files can be created by clicking the New file button in the toolbar, or by clicking File->New Csound file from the main menu. When a new file is requested, Cabbage will give you the choice of 3 basic templates, as shown
below. 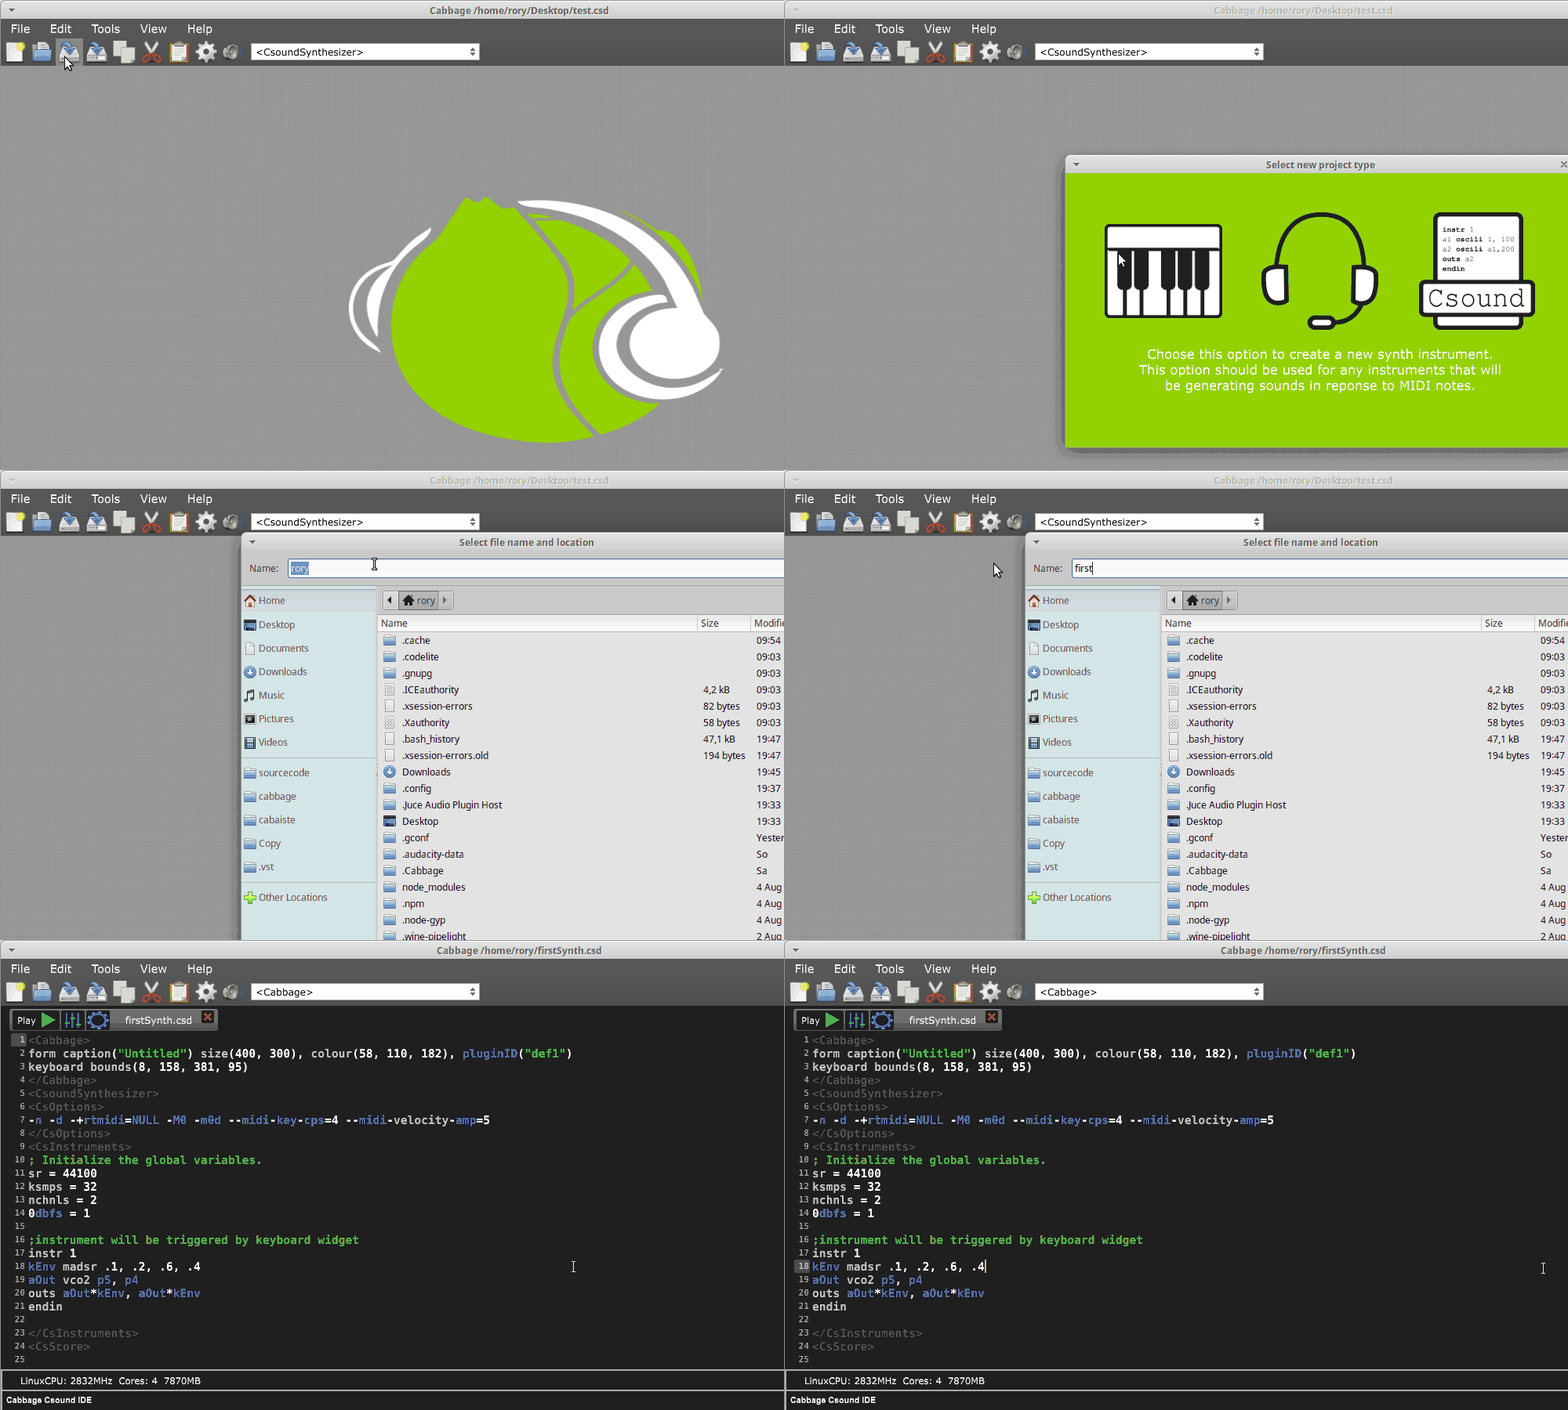 The choices are: - A new synth. When this option is selected Cabbage will generate a simple synthesiser with an ADSR envelope and MIDI keyboard widget. In the world of
VST, these instruments are referred to a VSTi's. - A new effect. When this option is selected Cabbage will create a simple audio effect. It will generate a simple Csound instrument that provides access to an incoming audio
stream. It also generates code that will control the gain of the output.
- A new Csound file. This will generate a basic Csound file without any graphical frontend.
Note that these templates are provided for quickly creating new instruments. One can modify any of the template code to convert it from a synth to an effect or vice versa.
Building/exporting instruments
To run an instrument users can use the controls at the top of the file's editor. Alternatively one can go to the 'Tools' menu and hit 'Build Instrument'. If you wish to export a plugin go to 'Export'
and choose the type of plugin you wish to export. More details on exporting plugins is available here. 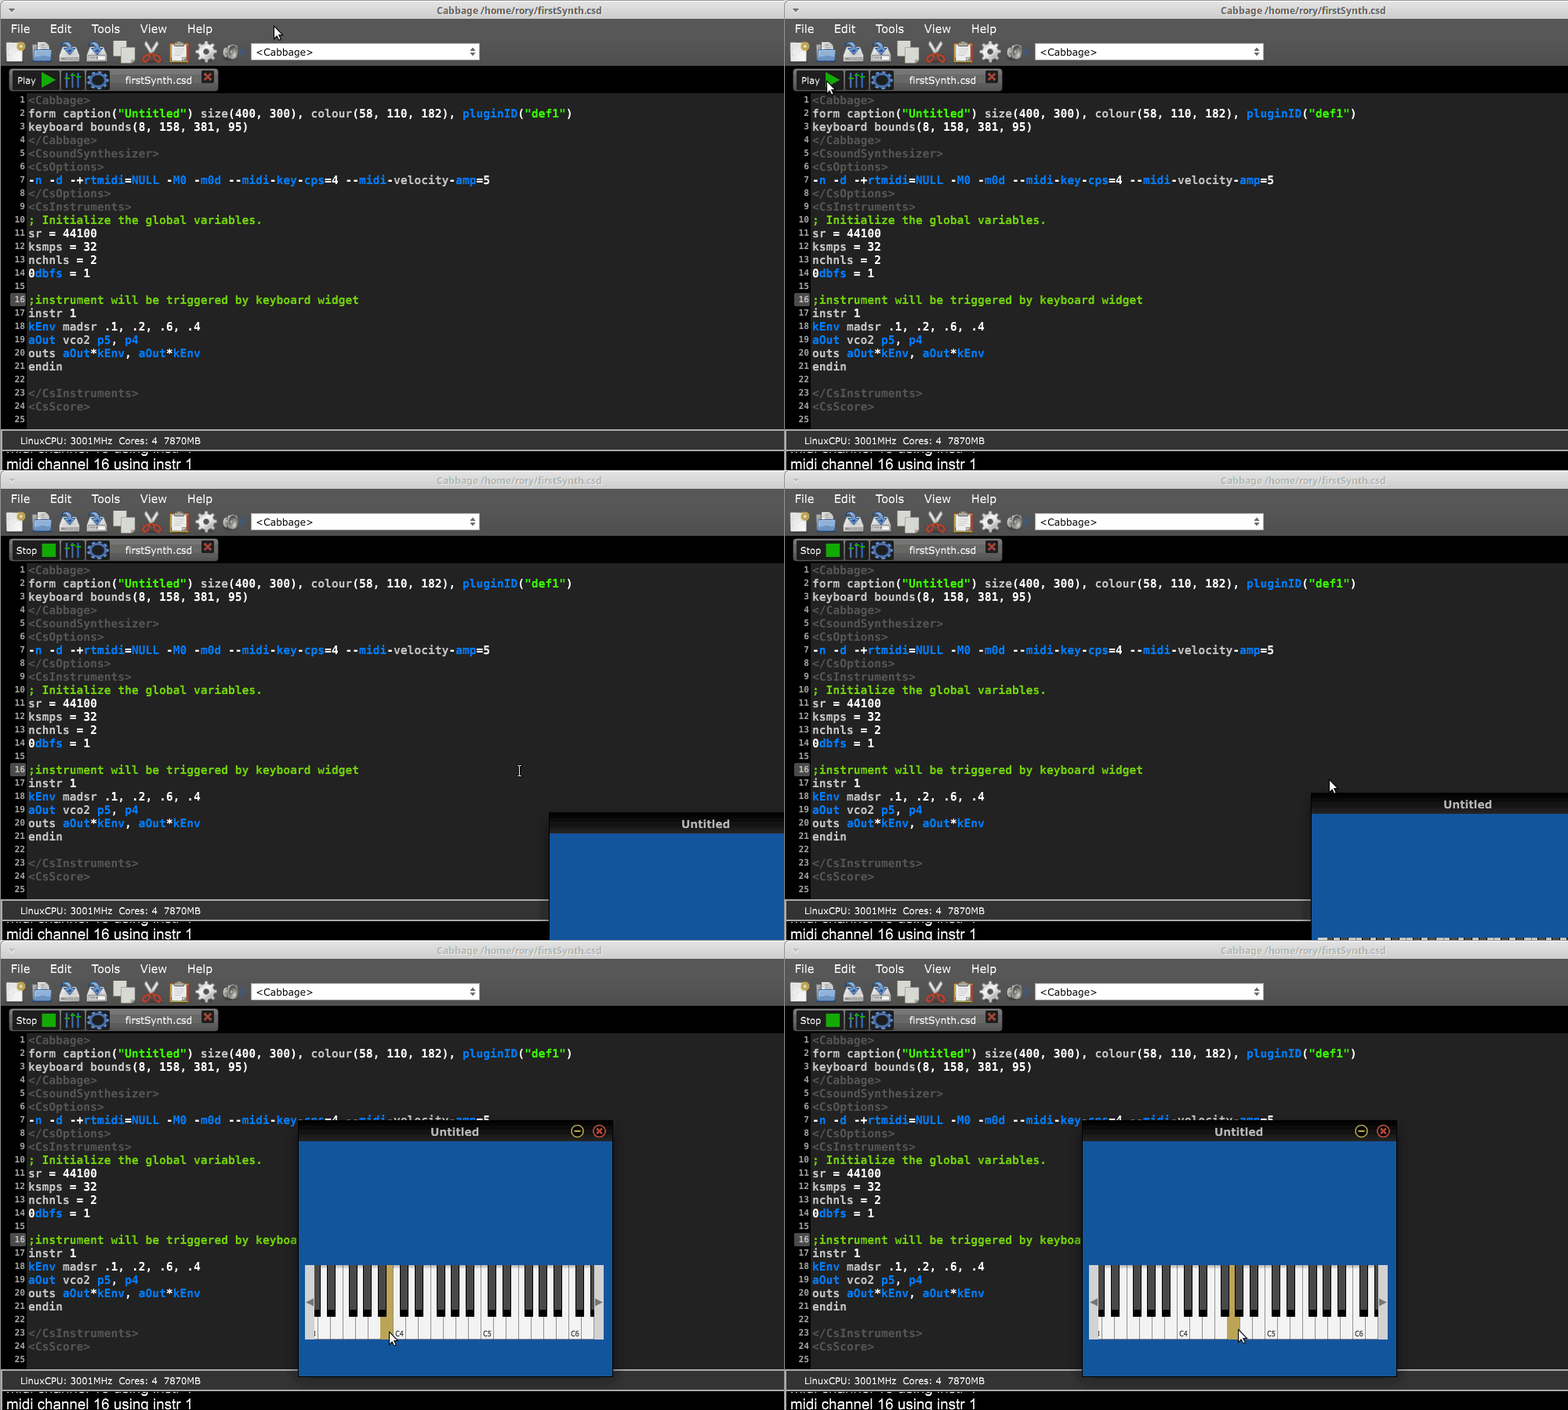
Closing a file will not stop it from performing. To stop a file from performing you must hit the Stop button.
Creating GUI interfaces for instruments
To create a GUI for your instrument you must enter edit mode for that instrument. You can do this by hitting the Edit mode button at the top of the file's editor, or by hitting Ctrl+e when the editor for that instrument have
focus. Once in edit mode, each widget will have a thin white border around it. you can move widgets around whilst in edit. You can also right-click and insert new widgets, as well as modify their appearance using the GUI properties
editor on the right-hand side of the screen. 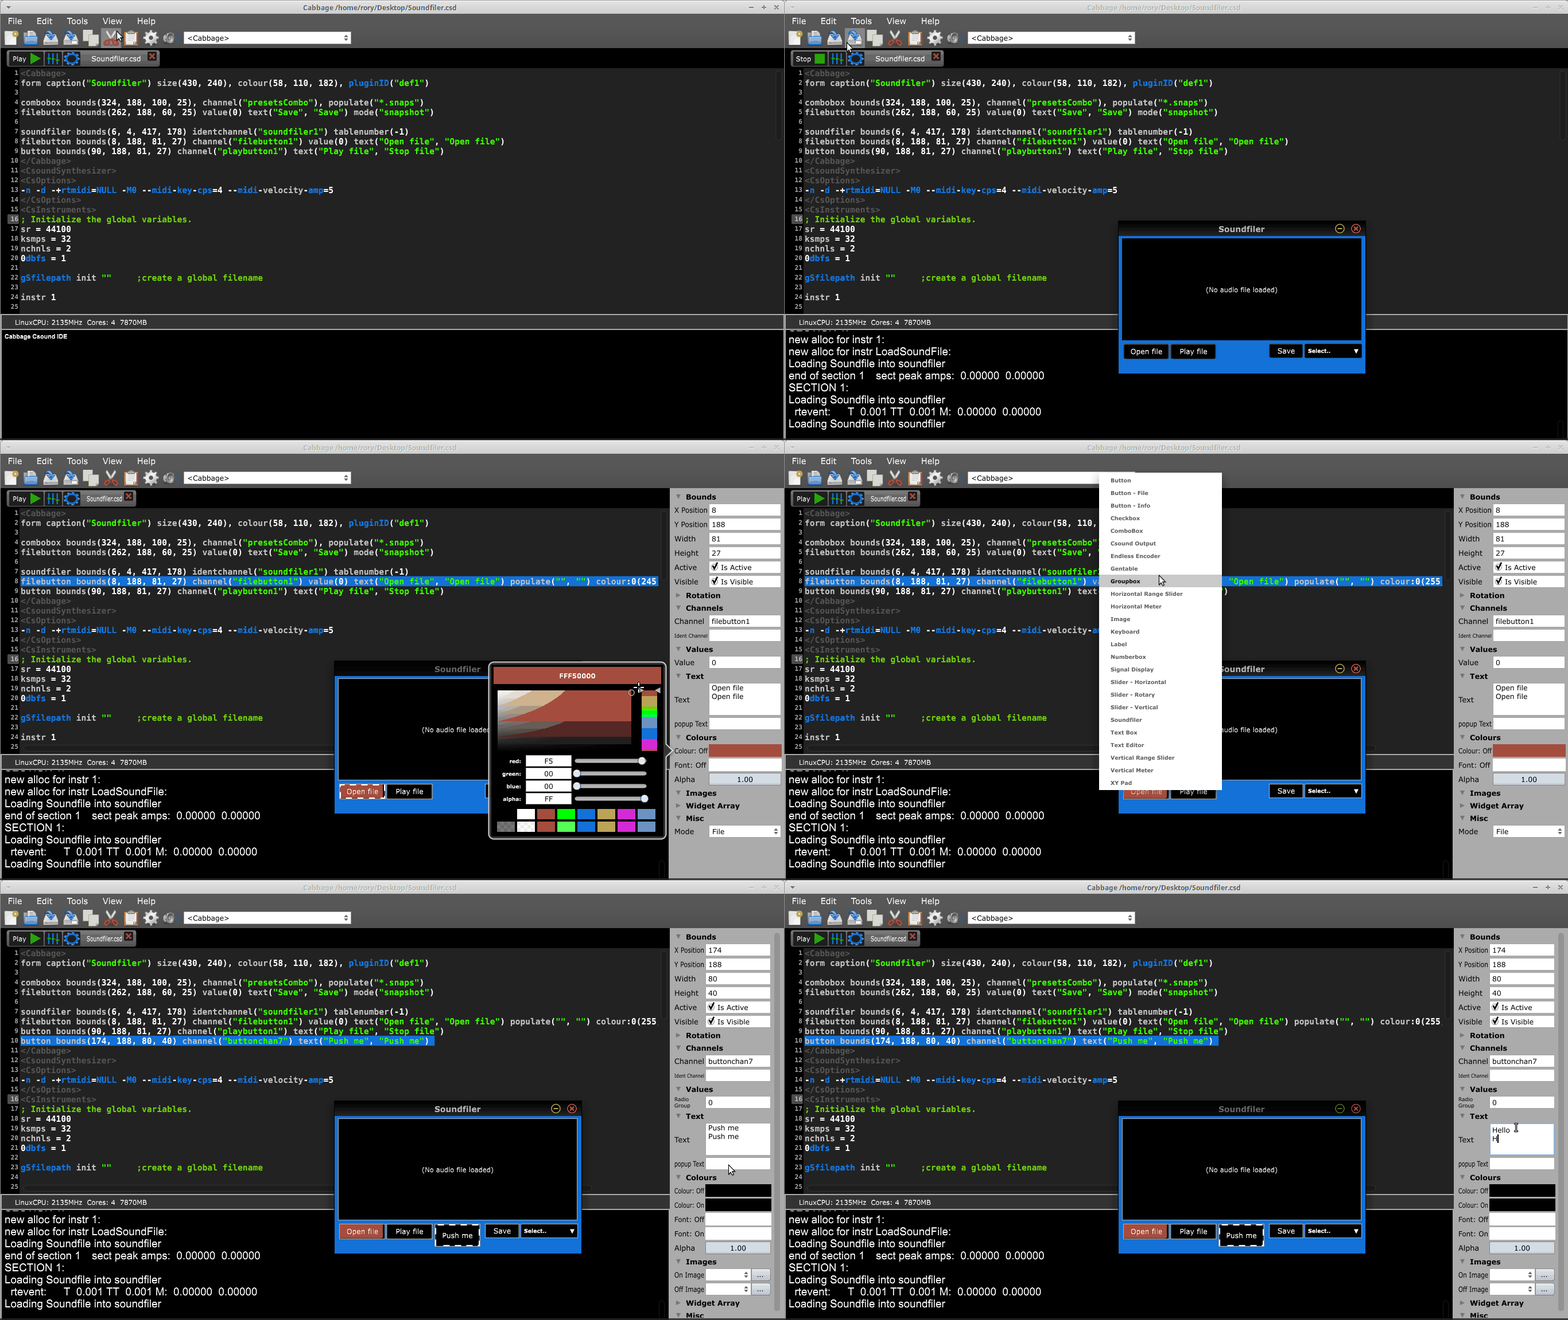 You will notice that when you select a widget whilst in edit mode, Cabbage will highlight the corresponding line of text in your
source code. When updating GUI properties, hit 'Enter' when you are editing single line text or numeric properties, 'Tab' when you are editing multi-line text properties, and 'Escape' when you are editing
colours.
Editing the audio graph
Each and every instrument that you compile in Cabbage will be added to an underlying audio graph. This is true for both Cabbage files, and traditional Csound files. To edit the graph one can launch the Cabbage patcher from the
view menu. 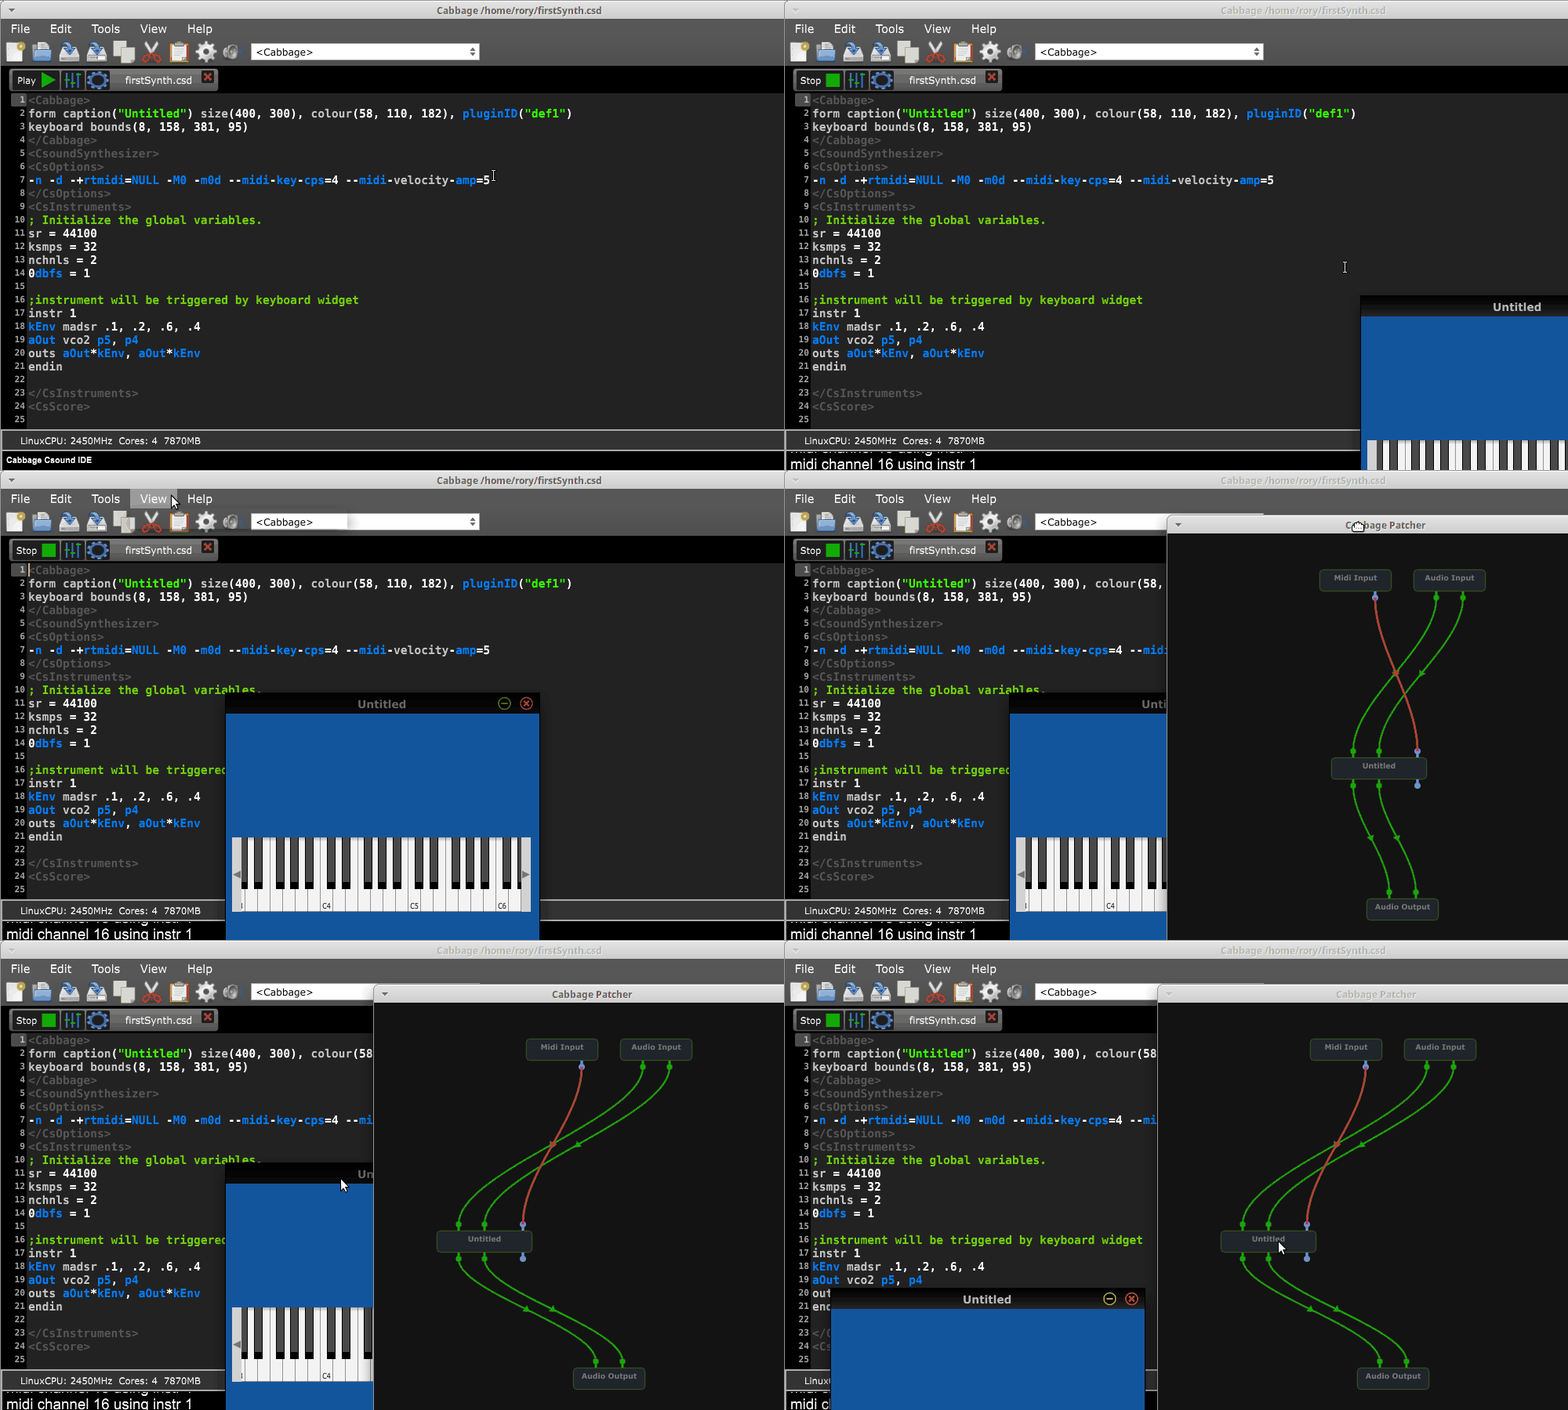 Instruments can also be added directly through the graph by right-clicking and adding them from the context menu. The context menu will show all the examples files,
along with a selection of files from a user-defined folder. See the section below on Settings to learn how to set this folder.
 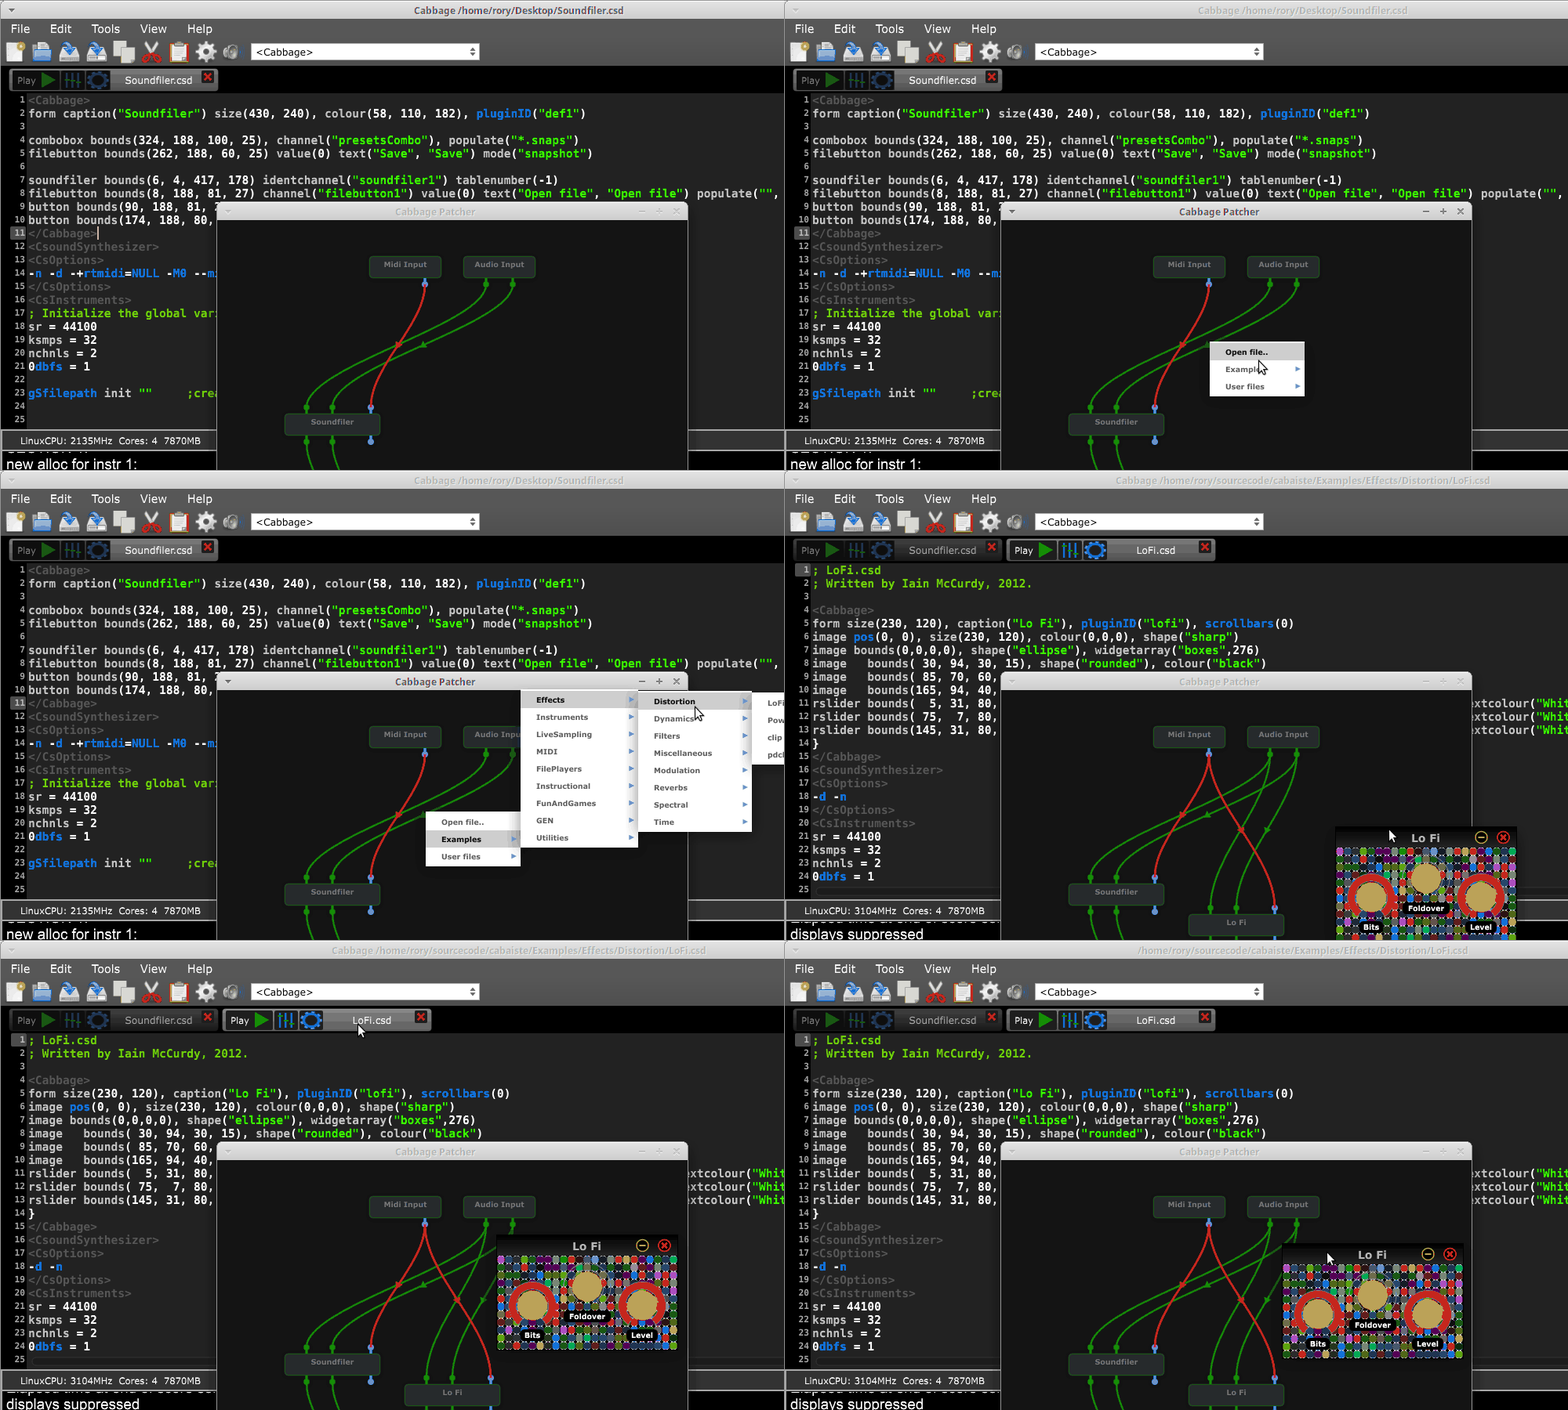 Instruments can also be deleted
by right-clicking the instrument node. Users can delete/modify connections by clicking on the connections themselves. They can also connect node by clicking and dragging from an output to an input.
 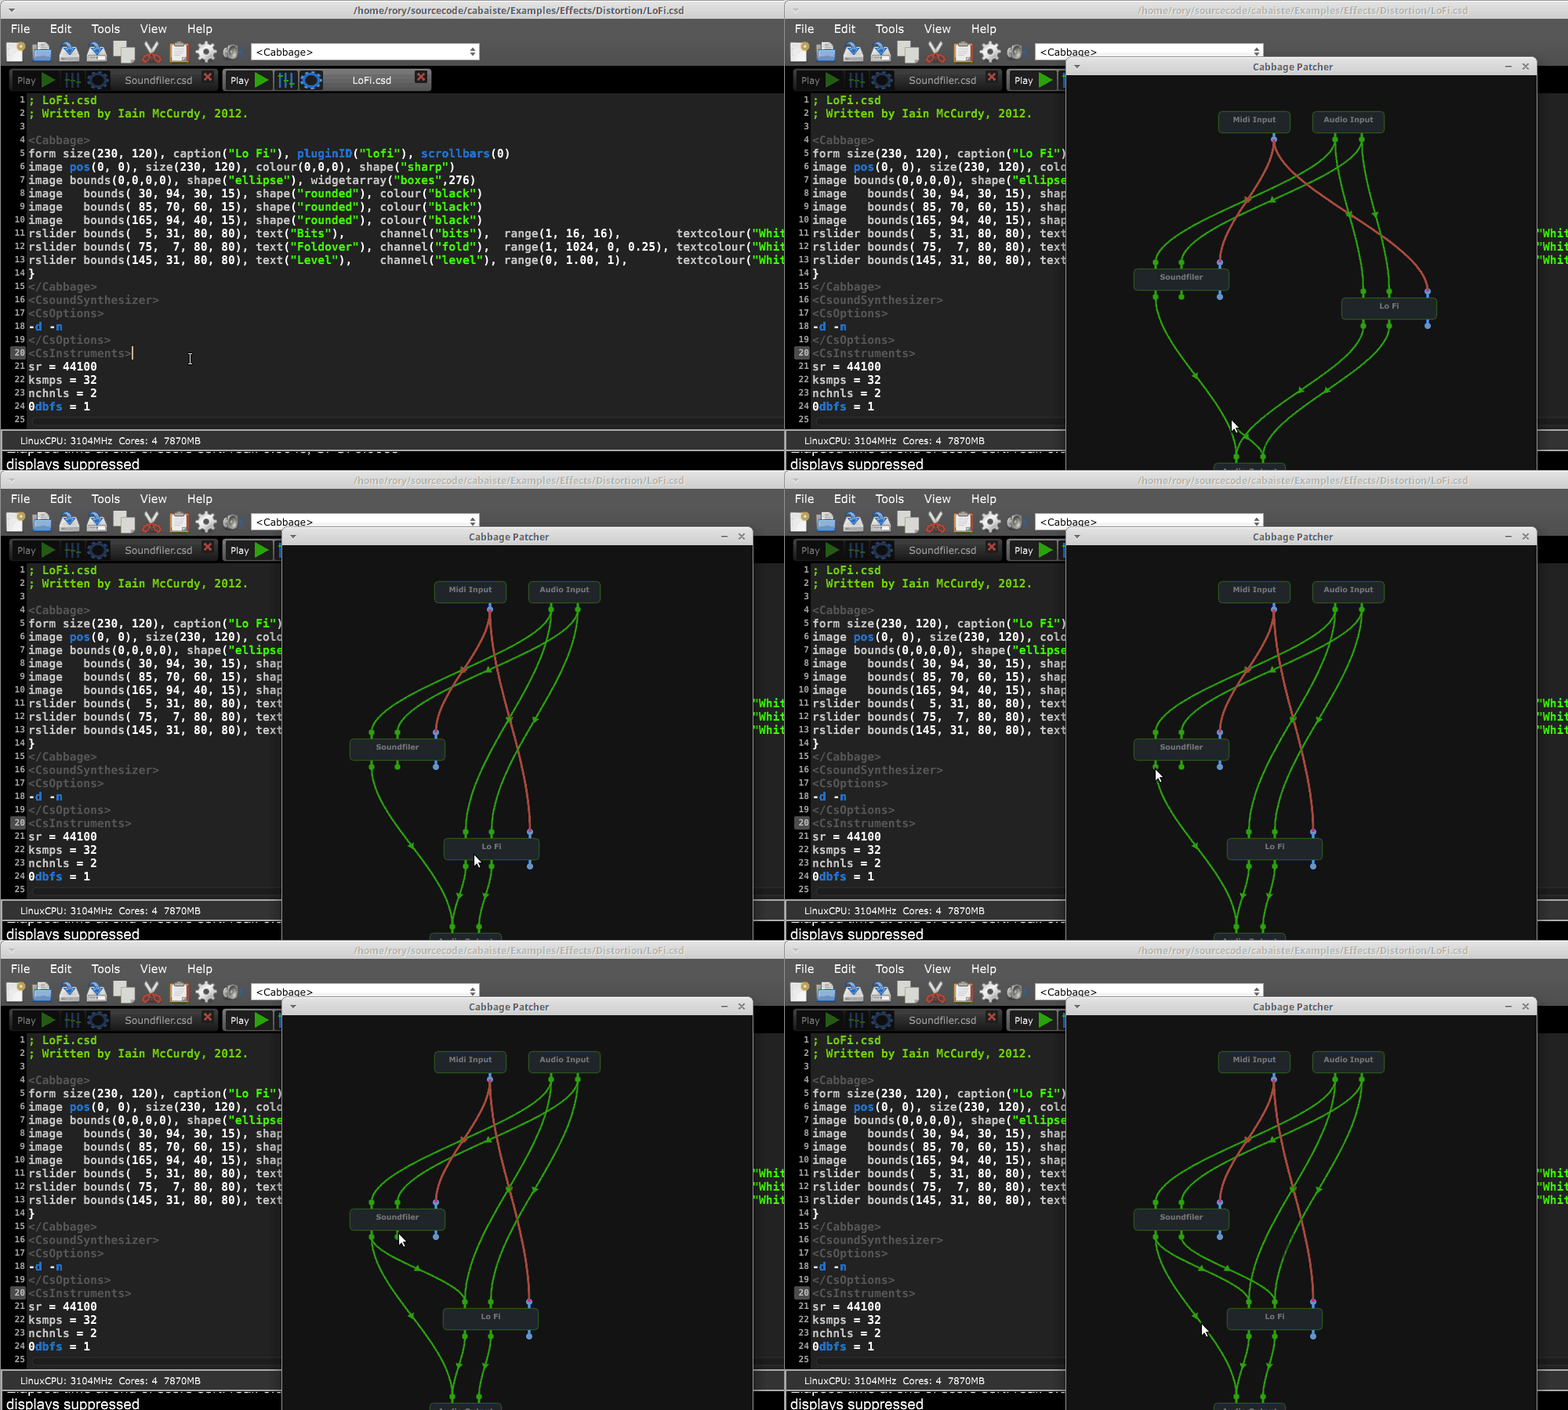 Once an instrument node has been added, Cabbage will automatically open the corresponding code. Each time you update the corresponding source code, the node will also be updated.
As mentioned above, closing a file will not stop it from performing. It is possible to have many instruments running even though their code is not showing. To stop an instrument you must hit the Stop button at the top of its editor, or delete the plugin from the graph.
Navigating large source files
It can become quite tricky to navigate very long text files. For this reason Cabbage provides a means of quickly jumping to instrument definitions. It is also possible to create a special ;- Region: tag. Any text that
appears after this tag will be appended to the drop-down combo box in the Cabbage tool bar. 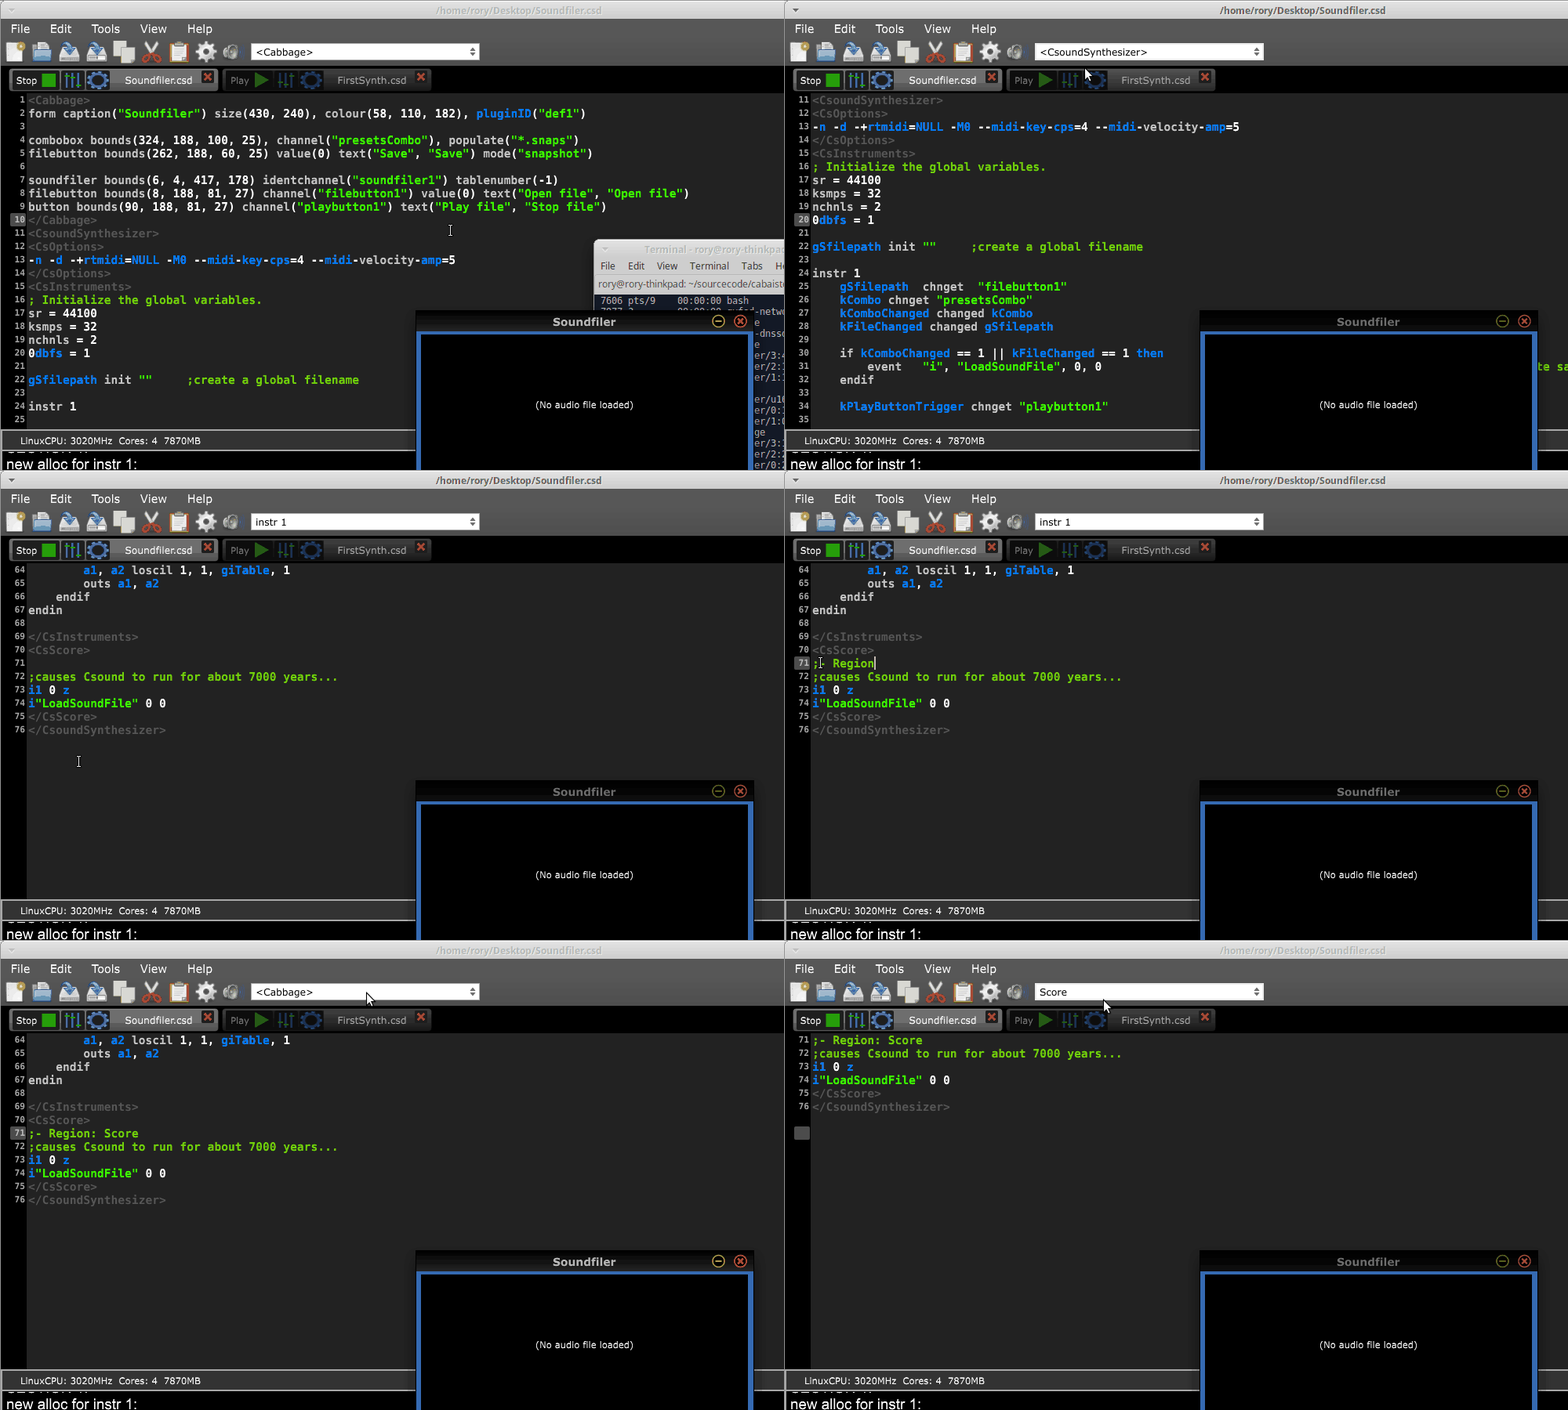
Using the code repository
Cabbage provides a quick way of saving and recalling blocks of code. To save code to the repository simple select the code you want, right-click and hit 'Add to code repository'. To insert code later from the repository,
right-click the place you wish to insert the code and hit 'Add from code repository'. 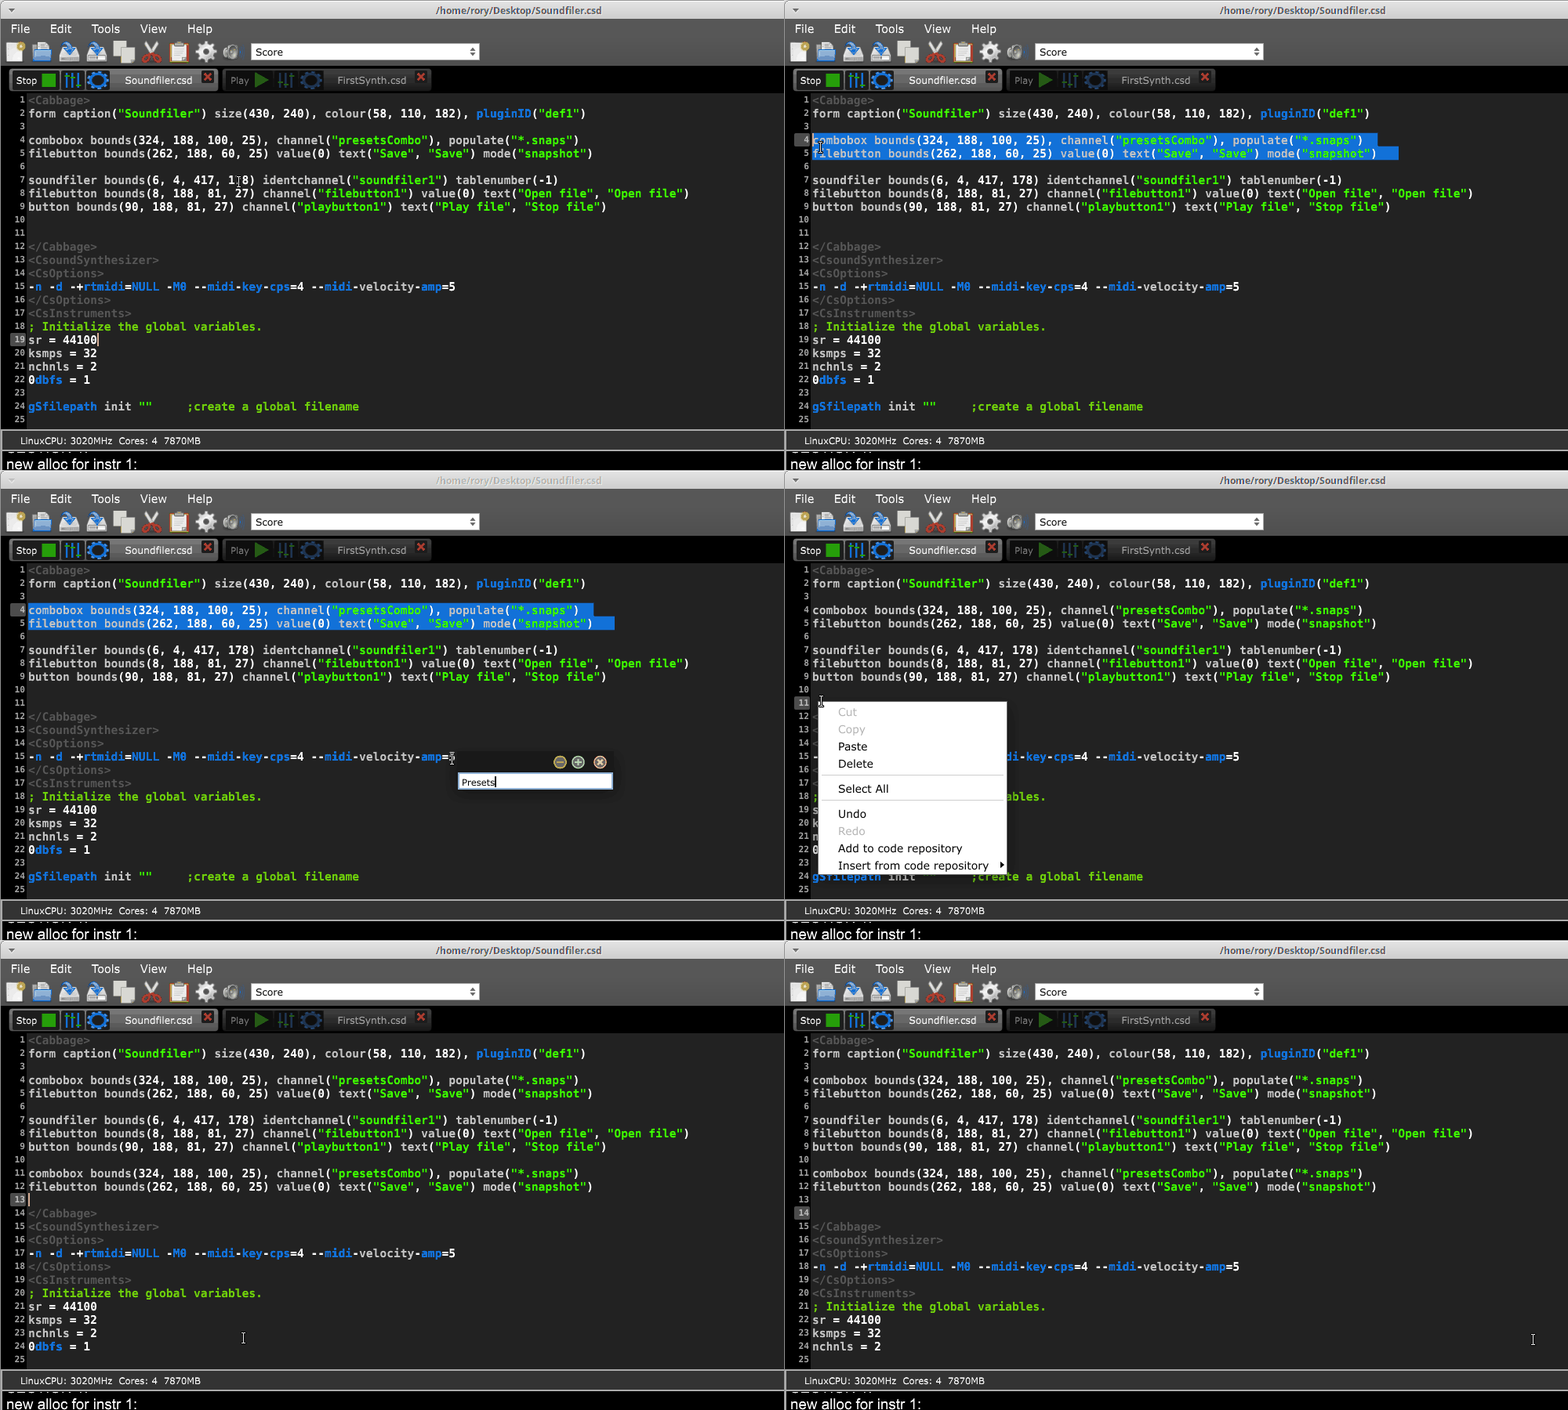 Code can be modified, edited or deleted at a later stage in the Settings dialogue.
Settings
The settings dialogue can be opened by going to the Edit->Setting menu command, or pressing the Settings cog in the main toolbar. There are four tabs in the Settings. Whenever changes are made to the settings they are automatically
saved. 
Audio and MIDI settings
These settings are used to choose your audio/MIDI input/output devices. You can also select the sampling rate and audio buffer sizes. Small buffer sizes will reduce latency but might cause some clicks in the audio. Note te buffer sizes selected here are only relevant when using the Cabbage IDE. Plugins will have their buffer sizes set by the host. The last known audio and MIDI settings will automatically be saved and recalled for the next session.
Miscellaneous.
Editor
The following settings provide control for various aspects of Cabbage and how it runs its instruments. - Auto-load: Enabling this will cause Cabbage to automatically load the last files that were open. - Plugin Window: Enable this checkbox to ensure that the plugin window is always on top and does not disappear behind the main editor when it loses focus. - Graph Window: Same as above only for the Cabbage patcher window. - Auto-complete: provides a rough auto-complete of variable names Editor lines to scroll with MouseWheel: Sets the number of lines to jump on each movement of the mouse wheel.
Directories
These directory fields are given default directories that rarely, if ever, need to be changed. - Csound manual directory: Sets the path to index.html in the Csound help manual. The default directories will be the standard location of the Csound help manual after installing Csound. - Cabbage manual directory: Sets the path to index.html in the Cabbage help manual. - Cabbage examples directory: Set the path to the Cabbage examples folder. This should never need to be modified. - User files directory: Sets the path to a folder containing user files that can be inserted by right-clicking in the patcher. Only files stored in this, and the examples path will be accessible in the Cabbage patcher context menu.
Colours
- Interface: Allows user to set custom colours for various elements of the main graphical interface
- Editor: Allows users to modify the syntax highlighting in the Csound editor
- Console: Allows users to changes various colours in the Csound output console.
Code Repository
This tab shows the various blocks of code that have been saved to the repository. You can edit or delete any of the code blocks. Hit Save/Update to update any changes.
